

Post by Frabjous on Sept 19, 2014 9:13:20 GMT
This tutorial appeared on my blog, but I thought I'd copy it here, so we can share images of finished samples, ask questions or comment. I only ask you not to repost this tutorial, but share a link if you want.
Finally, I wanted to ask you to share your tutorials in a separate thread as well. I know that in other forums some people stopped posting them because of the copyright issues. Here, you retain your copyright by default! I will try to find a proper language for it and will post as a part of our future Terms of Use.
____
Bound slit is used in dress or blouse necklines, and if you've made bound buttonholes this technique is similar. The final steps vary depending on whether the garment section is lined or not. In this post, I will explain how to make a squared off bound slit in an unlined blouse, like in the blouse that I've featured in one of my recent posts. The bottom of the slit can be also made pointed as an arrow, or squared off as in my blouse.


A note to my timid sewing friends: I hope the long instructions won’t scare you off. I just tried to be as detailed as possible ) Enjoy
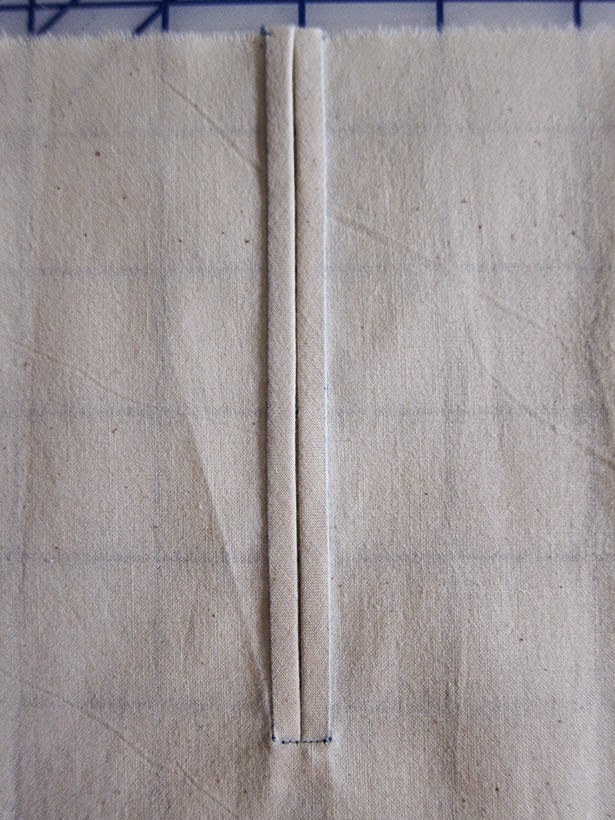
Finished bound slit. Stitches are done in contrasting thread.
STEP 1
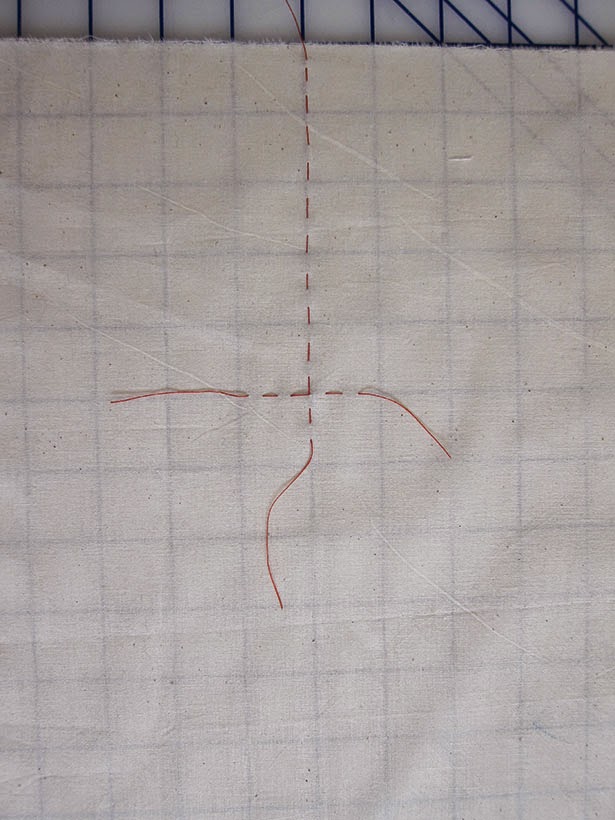
Thread trace the neckline opening along the the cutting line and the bottom line of the slit. Thread-tracing is most suitable marking technique because the marking is visible from both, right and wrong sides.
STEP 2
Cut two bias strips, about 5cm longer than the finished length to accommodate seam allowances, and about two times wider than the final width of the binding (check on a smaller scrap of fabric before you cut all the strips, some fabrics stretch a lot and you may need to cut the strips wider, refer to step 3 for explanation). My binding is 0.4 cm wide, so I cut a 3.2cm wide bias strip for each side.
The final width should be
2 x finished width + 1mm turn of the cloth + (2x finished width) for the seam allowance
+1mm allowance for the bias
I am adding the last 1mm as an allowance for the bias because during handling, the bias will inevitably stretch and become slightly narrower. 1mm should compensate for this little loss in the width after steaming and stretching described in the next step will
In my example, finished width is 0.4cm, so the calculation will look like this
(2 x 4mm) + 1mm + (2 x 4mm ) +1mm = 18mm
So, I am cutting twice the final width, at 3.6cm
I'd recommending cutting and stretching with steam a small bias strip to test the width before cutting the final binding.
STEP 3
Steam press the strips stretching them while pressing. They should retain only minimal give. This will help you control the bias and produce an even and accurate binding. After pressing the strips will be narrow and longer than when you cut them, in addition, depending on the fabric, you may have to trim them.
You will also notice that the ends of your strip are somewhat wider than the rest of it. You can trim those ends off, after measuring the bias strip again.

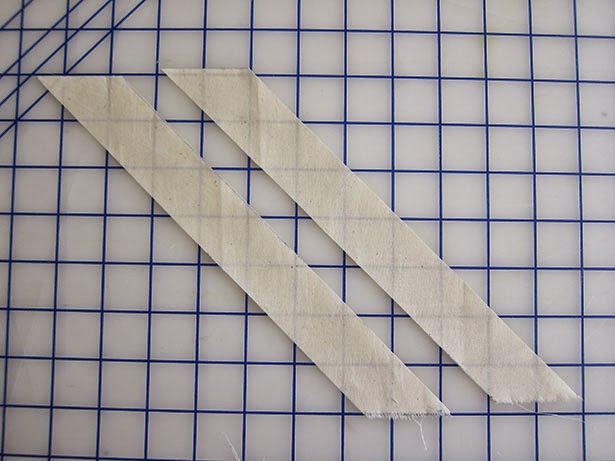
Bias strips, one before (top) and another after (bottom) pressing. My sample is made in muslin, so the strip width reduced by only 7mm
Trim the strips to the final width.
STEP 4
Mark 4mm from the trimmed edge of the bias strip using your favourite method: matching tracing paper, disappearing marker or thread tracing. For the first two methods, test on a fabric scrap, especially if you are working with silk or any other delicate fabric.

I am marking with Sharpie to make lines more visible on images. Normally I mark with matching tracing paper and a rounded tracing wheel. A sharp tracing wheel may leave marks on delicate fabrics
STEP 5
On the right side of fabric, place the first strip with the right sides together on one side of the slit opening, with the edge along the thread-traced cutting line. Baste the strip 0.4cm away from the cutting line, from the neckline edge to the thread-traced bottom line. Repeat for the other side. It is important to keep the basting line evenly spaced and parallel to the thread-traced opening line as it will serve as your stitching guide.

It is very helpful to end a basting stitch at the bottom line marking - this will serve as an additional guide when stitching. I've marked the spot with a short Sharpie line
STEP 6
Stitch the binding along the basting line, reducing the stitch length for the last one cm. Pull one thread end through the fabric, so the both ends are on one side and knot them. Cut off the thread ends close to the knot. Press the stitching lines from both sides: this will make turning of the binding easier and more accurate.


STEP 7
Cut the slit open along the treat-traced line, stopping at 0.5cm from the thread-traced bottom line. On the wrong side using embroidery scissors, clip diagonally the garment fabric layer, not the strips, from the end of the cutting line to the end of the stitching.


STEP 8
Turn the binding over slit seam allowances. Press. Repeat with the other side

Turn the binding around the edge of the cut slit, carefully moving the bottom edges to the inside. Press lightly. Turn under the raw edges: the binding should meet the stitched line, pin. The binding should now measure 0.4mm. Baste.

Basted binding from the wrong side
You can skip basting if you can control the fabric and fell stitch (next step) a couple of centimetres at a time while turning the binding allowance inside.
STEP 9
Using fell stitches, stitch the binding to the stitched line. Repeat with the other binding. Press lightly

Top binding is fell-stitched in matching thread, the bottom binding - in contrasting thread

Right side after fell stitching
At this point I like to baste together the bound edges to have more control for the next step. Diagonal basting stitch is perfect for this purpose. You can just baste from the wrong side, through the bottom layers.
STEP 10
Fold the garment along the thread-traced bottom line, with the bias binding on the bottom, exposing the clipped triangle, which should lie over the ends of the binding. If you want more control, pin left and right from the triangle. Baste (I skip this step for cottons). Stitch across the thread traced bottom line through the binding edges. Knot the ends.


Thread the needle with the end thread and hide it in the bias binding.

Trim the ends to 0.5cm – 1cm. Remove diagonal basting thread and press.
STEP 10
Slip stitch to gather the ends of the bias bindings on the wrong side and hand-overcast the raw edges. The bound slit is done.

Finished bound slit, wrong side

Finished bound slit, right side
That's it! If you will use this tutorial, I'd love to see images of finished bound slits here.
Finally, I wanted to ask you to share your tutorials in a separate thread as well. I know that in other forums some people stopped posting them because of the copyright issues. Here, you retain your copyright by default! I will try to find a proper language for it and will post as a part of our future Terms of Use.
____
Bound slit is used in dress or blouse necklines, and if you've made bound buttonholes this technique is similar. The final steps vary depending on whether the garment section is lined or not. In this post, I will explain how to make a squared off bound slit in an unlined blouse, like in the blouse that I've featured in one of my recent posts. The bottom of the slit can be also made pointed as an arrow, or squared off as in my blouse.
A note to my timid sewing friends: I hope the long instructions won’t scare you off. I just tried to be as detailed as possible ) Enjoy
Finished bound slit. Stitches are done in contrasting thread.
STEP 1
Thread trace the neckline opening along the the cutting line and the bottom line of the slit. Thread-tracing is most suitable marking technique because the marking is visible from both, right and wrong sides.
STEP 2
Cut two bias strips, about 5cm longer than the finished length to accommodate seam allowances, and about two times wider than the final width of the binding (check on a smaller scrap of fabric before you cut all the strips, some fabrics stretch a lot and you may need to cut the strips wider, refer to step 3 for explanation). My binding is 0.4 cm wide, so I cut a 3.2cm wide bias strip for each side.
The final width should be
2 x finished width + 1mm turn of the cloth + (2x finished width) for the seam allowance
+1mm allowance for the bias
I am adding the last 1mm as an allowance for the bias because during handling, the bias will inevitably stretch and become slightly narrower. 1mm should compensate for this little loss in the width after steaming and stretching described in the next step will
In my example, finished width is 0.4cm, so the calculation will look like this
(2 x 4mm) + 1mm + (2 x 4mm ) +1mm = 18mm
So, I am cutting twice the final width, at 3.6cm
I'd recommending cutting and stretching with steam a small bias strip to test the width before cutting the final binding.
STEP 3
Steam press the strips stretching them while pressing. They should retain only minimal give. This will help you control the bias and produce an even and accurate binding. After pressing the strips will be narrow and longer than when you cut them, in addition, depending on the fabric, you may have to trim them.
You will also notice that the ends of your strip are somewhat wider than the rest of it. You can trim those ends off, after measuring the bias strip again.
Bias strips, one before (top) and another after (bottom) pressing. My sample is made in muslin, so the strip width reduced by only 7mm
Trim the strips to the final width.
STEP 4
Mark 4mm from the trimmed edge of the bias strip using your favourite method: matching tracing paper, disappearing marker or thread tracing. For the first two methods, test on a fabric scrap, especially if you are working with silk or any other delicate fabric.
I am marking with Sharpie to make lines more visible on images. Normally I mark with matching tracing paper and a rounded tracing wheel. A sharp tracing wheel may leave marks on delicate fabrics
STEP 5
On the right side of fabric, place the first strip with the right sides together on one side of the slit opening, with the edge along the thread-traced cutting line. Baste the strip 0.4cm away from the cutting line, from the neckline edge to the thread-traced bottom line. Repeat for the other side. It is important to keep the basting line evenly spaced and parallel to the thread-traced opening line as it will serve as your stitching guide.
It is very helpful to end a basting stitch at the bottom line marking - this will serve as an additional guide when stitching. I've marked the spot with a short Sharpie line
STEP 6
Stitch the binding along the basting line, reducing the stitch length for the last one cm. Pull one thread end through the fabric, so the both ends are on one side and knot them. Cut off the thread ends close to the knot. Press the stitching lines from both sides: this will make turning of the binding easier and more accurate.
STEP 7
Cut the slit open along the treat-traced line, stopping at 0.5cm from the thread-traced bottom line. On the wrong side using embroidery scissors, clip diagonally the garment fabric layer, not the strips, from the end of the cutting line to the end of the stitching.
STEP 8
Turn the binding over slit seam allowances. Press. Repeat with the other side
Turn the binding around the edge of the cut slit, carefully moving the bottom edges to the inside. Press lightly. Turn under the raw edges: the binding should meet the stitched line, pin. The binding should now measure 0.4mm. Baste.
Basted binding from the wrong side
You can skip basting if you can control the fabric and fell stitch (next step) a couple of centimetres at a time while turning the binding allowance inside.
STEP 9
Using fell stitches, stitch the binding to the stitched line. Repeat with the other binding. Press lightly
Top binding is fell-stitched in matching thread, the bottom binding - in contrasting thread
Right side after fell stitching
At this point I like to baste together the bound edges to have more control for the next step. Diagonal basting stitch is perfect for this purpose. You can just baste from the wrong side, through the bottom layers.
STEP 10
Fold the garment along the thread-traced bottom line, with the bias binding on the bottom, exposing the clipped triangle, which should lie over the ends of the binding. If you want more control, pin left and right from the triangle. Baste (I skip this step for cottons). Stitch across the thread traced bottom line through the binding edges. Knot the ends.
Thread the needle with the end thread and hide it in the bias binding.
Trim the ends to 0.5cm – 1cm. Remove diagonal basting thread and press.
STEP 10
Slip stitch to gather the ends of the bias bindings on the wrong side and hand-overcast the raw edges. The bound slit is done.
Finished bound slit, wrong side
Finished bound slit, right side
That's it! If you will use this tutorial, I'd love to see images of finished bound slits here.


